Lemonade from Lemons: Dealing with Windows 10

Photo by Florencia Potter on Unsplash
It happens. You run out of drive space for data, RAM and processing power for everyday use, and you need a new laptop. This happened to my wife who remedied the situation with a new Lenovo Flex 5, and it came with Windows 10. I don’t know if you’ve been following along with this whole security thing, but it seems like Microsoft keeps making security mistakes. The latest Windows 10 is no exception, and in fact in many ways some of the problems are even more ridiculous than you might imagine. That’s because they’re features.
Microsoft has improved their overall security model quite a bit, with regular patches being made available monthly covering security issues, and the ability to apply those patches automatically. So it is sad to see things like privacy and network protocols come into play, and basically undo all that good work.
I thought I could quickly resolve things on my wife’s computer. You see, it’s not like I haven’t done this type of work before. In 2016 I released a paper on the topic and even spoke at several conferences about the subject. In the summer of 2018 I revisited the project and found a few things had changed, although that revamp was never released. It doesn’t matter as both are outdated, from 2016 and 2018. I am writing this in January 2019 with the full realization that this information will probably be outdated in 6-9 months. I hope not.
I made a video where I talk about some of the reasons why Microsoft keeps changing things. But a video isn’t the best forum for details technical data, so that will be covered in this rather lengthy blog post. I’ll address the two main areas of concern - privacy and network security. We’ll cover privacy first.
Privacy
The fix is simple - you have to disable and delete.
During that first boot of your new Windows laptop, you will encounter privacy settings. In spite of what they tell you about the impact to your user experience, turn every single one of them off. You will reach a point where you are asked to sign in with your Microsoft account, and it is in the form of your Live, Hotmail, Skype, Bing or Outlook credentials - I think there are at least 8 you can pick from. If you don’t have one, you can sign up for one, but don’t do that. Choose “Offline account” at the bottom of the screen in non-emphasized text. Naturally you will be met with some resistance suggesting an online account is the way to go, but do the offline account anyway.
Just these simple steps will eliminate a huge amount of privacy violations and data gathering, but it won’t be all of it. You have more steps to do.
On the search bar at the bottom of your screen, type in the word privacy and you should see Privacy Settings appear at the top. Click on it (see Figure 1).
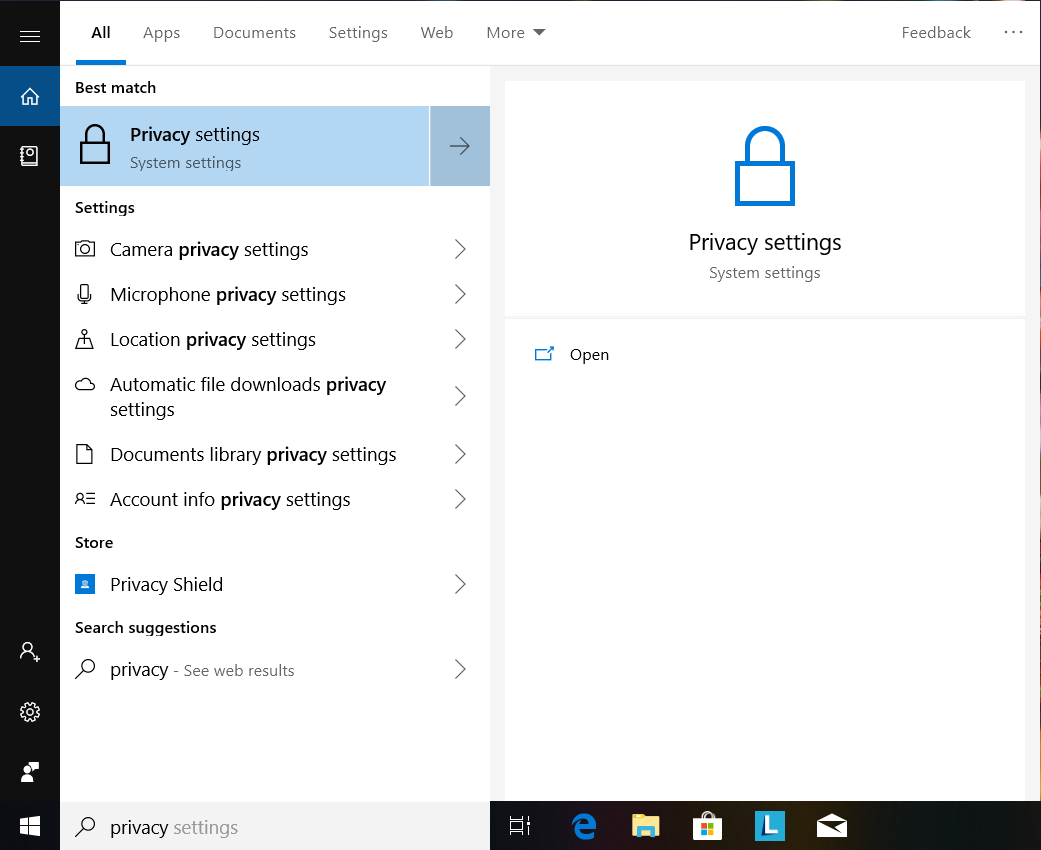
Figure 1. Open up Privacy settings.
Once you are in, there are a lot of categories listed down the left side, with the corresponding settings on the right side (see Figure 2). As of this writing, there are five categories listed under “Windows permissions” and a ton listed under “App permissions.” Go through each category listed on the left side and disable the settings on the right side. Since you made all of those choices during the first boot, a number of selections will already be set to “Off”. This will still take a while, but it is worth it.

Figure 2. Those three buttons set to “On” need to be clicked on to turn them off. Plus, turn off the zillion other settings in Privacy as well.
Yes, this could cause issues running certain apps. For example, if you use an app to do video chat, you may have to come back in and adjust settings to allow that app to access your laptop’s camera or microphone. Adjust things as needed to use the apps you wish to use.
Let’s delete some apps we don’t need - they phone home and are not needed.
I don’t know what exactly might be loaded up in those tiles, but I simply went through and right-clicked on every one of them. If there was an option to uninstall, I uninstalled it. Otherwise I unpinned it. I did so until the tiles were completely cleared. This may be overkill for some people, but it really appealed to my sense of order. Much cleaner.
On the search bar, type in Apps and select “Apps & features”. Alternately you can type in Add and select “Add or remove programs”, but you end up in the same place (see Figure 3).
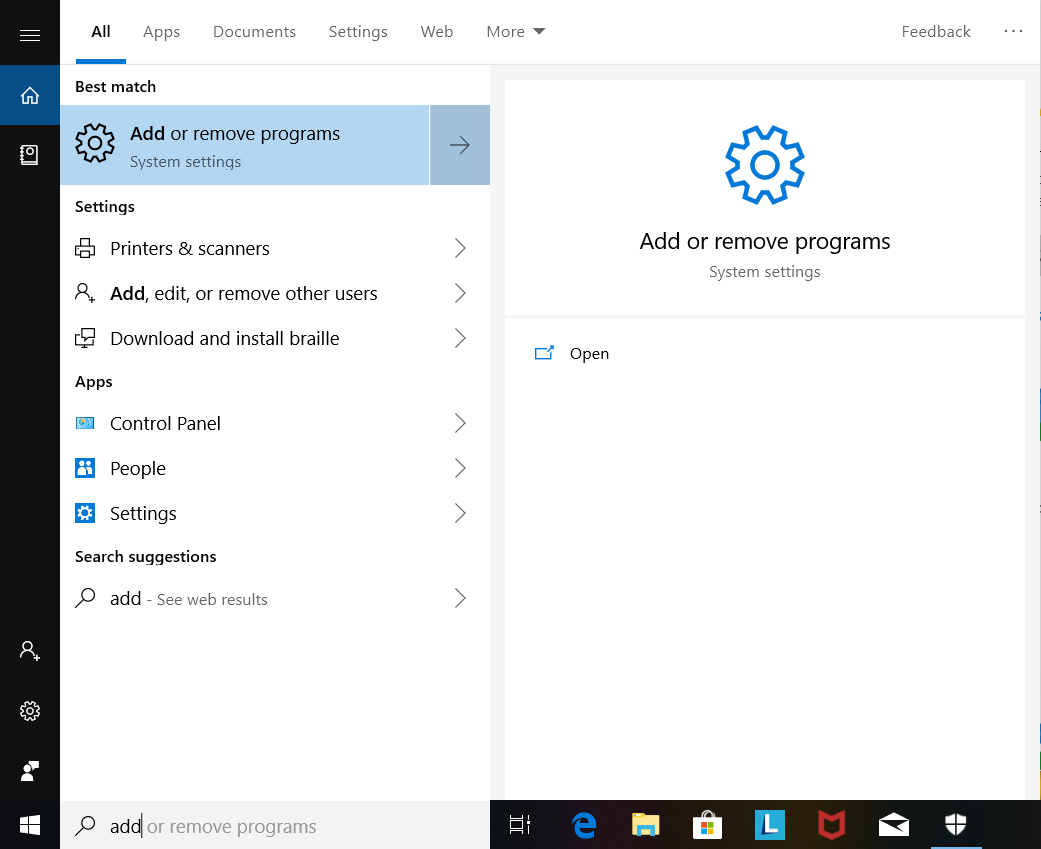
Figure 3. Time to delete a few apps.
Once in “Apps & features” you can start uninstalling a number of apps. First up, get rid of McAfee’s anti-virus program, in this version of Windows 10 it is called McAfee LiveSafe (see Figures 4-6). Sure it is a free trial, but you don’t need it. Windows 10 comes with Windows Defender which is more than adequate to meet antivirus needs.

Figure 4. Highlight McAfee LiveSafe and hit Uninstall. A box will pop up, hit Uninstall on that as well.

Figure 5. Make sure you check all the boxes before hitting Remove.

Figure 6. You’re done! In the current versions of Windows Defender, it simply takes over as your anti-virus solution so your computer is safe. Hit Restart now.
There are still plenty of apps to delete. If you own a Lenovo, go into “Apps & features” again and remove every app from Lenovo. Same for Acer, Toshiba, or whoever your laptop vendor is. The only exception to this is a vendor app that works specifically with the hardware. For example, if your laptop can fold up into a tablet-style configuration, there might be a vendor app to help with that function. Other than that, virtually all vendor apps are not needed. If you don’t believe me, think about an office environment filled with Windows computers, and the hardware is all, say Dell. Are there half a dozen Dell apps running on those corporate desktop and laptop systems? No, of course not, so feel free to delete them.
Glance through the list of applications. Anything not written by Microsoft is suspect, although there may be a few apps that are directly related to your hardware you should leave intact. Rule of thumb, if the app is from a software-only company or from a website, delete it.
Are you done with privacy issues? Unfortunately there are a few minor tweaks needed that cannot be addressed easily. Right click on the Windows icon in the bottom left corner of the screen and click on “Windows PowerShell (Admin)”. You’ll need to run the following commands to prevent a bit more data collection:
REG ADD “HKLM\Software\Policies\Microsoft\Windows\DataCollection” /v ”AllowTelemetry” /t REG_DWORD /d “0” /f
REG ADD “HKLM\Software\Microsoft\Windows\CurrentVersion\Device Metadata” /v ”PreventDeviceMetadataFromNetwork” /t REG_DWORD /d “1” /f
It should be noted you can also go into the Registry and make the above edits in a GUI. However as of this writing PowerShell commands worked fine. Only two more steps and you’re done with the privacy issues.
On the search bar, type in services and pull up the Services app. You need to stop and disable a couple of services. The first one is “Connected User Experiences and Telemetry”. Scroll down to find it, and double-click on it to bring up its properties (see Figure 7).

Figure 7. Connected User Experiences and Telemetry. This needs to be stopped and disabled.
Under “Service status” click “Stop” to stop the service from running. You also need to click on the “Startup type” pull down menu and select Disabled. Once you’ve done that, click Apply then OK. Next, scroll down and find “dmwappushsvc” and double-click on it (see Figure 8).
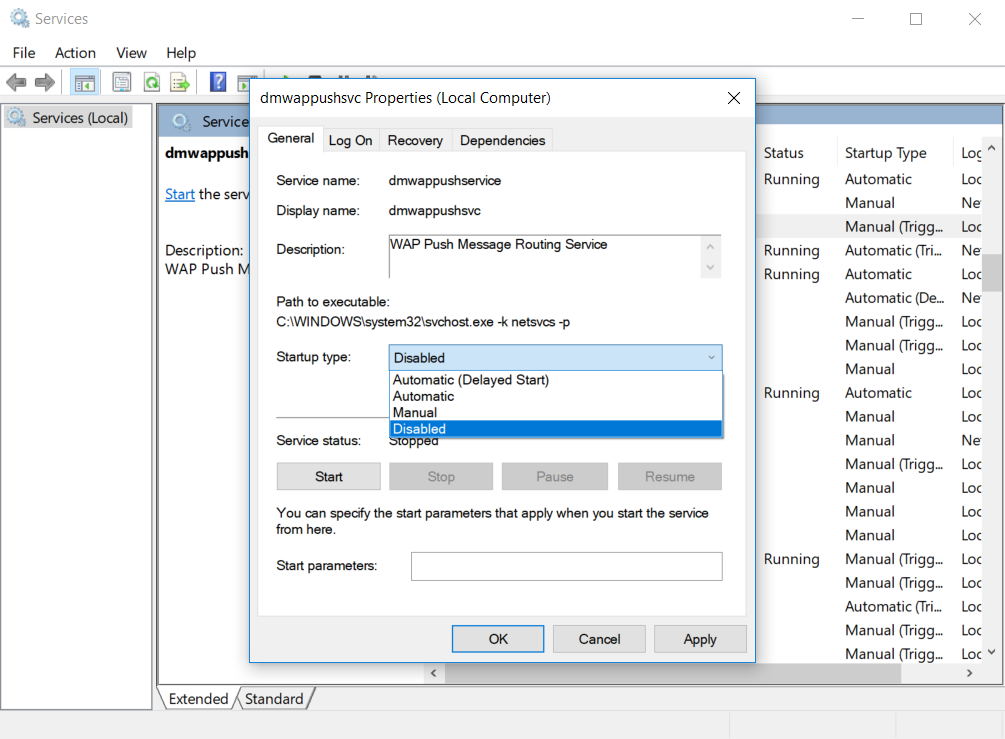
Figure 8. The service totally not named by an engineer - dmwappushservice. Thank goodness its display name was shortened to the more conversational dmwappushsvc.
Like before, under Service status click on Stop and under the “Startup type” pull down menu and select Disabled. Hit Apply then OK.
Regarding that search bar you’ve been using to find utilities, it used to be fairly plain. For some reason Microsoft thought they’d add a digital assistant and they based it off of Cortana, the near-naked character from the popular Halo game. To do her job as a digital assistant, Cortana has to collect data. Since you’ve turned off all of the data gathering, Cortana will pester you to turn it back on. First search for Cortana in Settings using the tool bar, and disable everything Cortana (most will be disabled at this point anyway). Then you can get your original search bar back and be free from Cortana with a single command. Right click on the Windows icon in the bottom left corner of the screen and click on “Windows PowerShell (Admin)”. Here is the command you need to run:
REG ADD “HKLM\Software\Policies\Microsoft\Windows\Windows Search” /v ”AllowCortana” /t REG_DWORD /d “0” /f
Finally, the privacy part of this laptop is resolved. The network security part is next.
Network Security
Fortunately this part isn’t as long, although no less tedious. It can be summed up with a couple of points - there are services needlessly exposed to the network, and there are protocols talking to the network that are well known as attack vectors among attackers. We can address the exposed services via firewall settings.
On the search bar type in “Firewall” and you will find the Windows Defender Security Center. Once in the Security Center click on “Firewall & network protection”, then click on Advanced settings. In roughly the middle of the screen will be a section that says “Public Profile” (or Public Profile is Active). Underneath that is a green arrow pointing at Windows Defender Firewall Properties. Click on it (see Figure 9).

Figure 9. Block everything!
Click on the “Public Profile” tab near the top of the window, and on the pull down menu next to “Inbound connections” select “Block all connections”. Click on Apply, then OK. Local services are no longer exposed on public networks.
There are a handful of network protocols that need to be disabled, as they are on by default and expose your system to potential abuse. The protocols in question are as follows:
I won’t go into huge detail because their use as attack vectors is documented well enough on the Internet, but the main point is this - they make queries to the network around them, and trust all or part of the answers being given to them without checking to see who is giving out these answers. Attackers know what answer each query will expect, and will set up an attack to make it happen. There are even tools out there to make exploitation easy, usually in the form of either stealing data (like passwords) or allowing for malicious code to be executed on the victim’s computer. You know, the usual bad stuff.
Right click on the Windows icon in the bottom left corner of the screen and click on “Windows PowerShell (Admin)”. The following commands will fix most of the issues:
netsh interface teredo set state disablednetsh interface isatap set state disabledREG ADD “HKLM\Software\Policies\Microsoft\Windows NT\DNSClient” /v ”EnableMulticast” /t REG_DWORD /d “0” /fREG ADD “HKLM\Software\Policies\Microsoft\Windows NT\DNSClient” /v ”DisableSmartNameResolution” /t REG_DWORD /d “1” /fREG ADD "HKLM\SYSTEM\CurrentControlSet\Services\Dnscache\Parameters" /v "DisableParallelAandAAAA" /t REG_DWORD /d "1" /fREG ADD "HKLM\SYSTEM\CurrentControlSet\Services\Tcpip\Parameters" /v "UseDomainNameDevolution" /t REG_DWORD /d "0" /f
For the curious, yes it is possible that some of these Registry settings are already enabled or set this way, but make sure you perform these steps. After entering in the commands above, there are two additional areas that need attention.
LLMNR has been “forced” into a part of the code base where it cannot be disabled. This change has occurred in just the last few months by Microsoft. Therefore we have to mitigate things. The best we can do is hard code in a DNS server for both IPv4 and IPv6 protocols, and then hope any VPN software we might be using has settings in it to help mitigate things as well. While I can’t show you the steps for every VPN software application out there, I can show you where to add those DNS servers.
On the search bar type in Network and select Network status. In the section labeled “Change your network settings” pick “Change adapter options”. Double-click on your wireless adapter, and select Properties. This brings up a window where we will do some tweaking (see Figure 10). There are two properties we need to adjust - “Internet Protocol Version 4” and “Internet Protocol Version 6”. Click on “Internet Protocol Version 4” first, and then select Properties. Once in “Internet Protocol Version 4 Properties”, click on Advanced (see Figure 11).
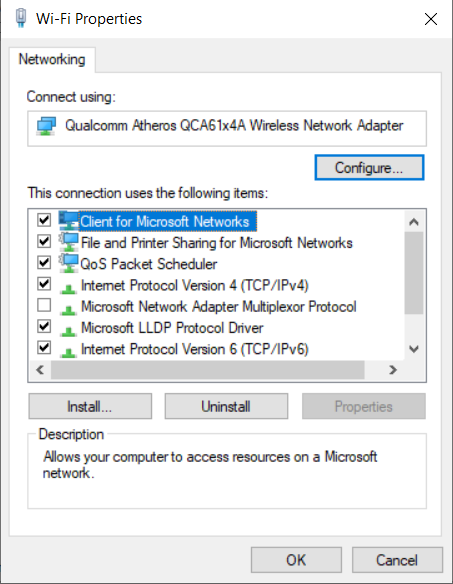
Figure 10. Adjusting both IPv4 and IPv6 will start from here.

Figure 11. IPv4 properties.
In the Advanced TCP/IP Settings, you need to unchecked “Automatic metric” (see Figure 12). The default value of 15 is fine, so click OK. Back on the “Internet Protocol Version 4 Properties” screen, you’ll need to click the radio button next to “Use the following DNS server addresses” and add in the IPv4 address of a known DNS server (see Figure 13). You’ll need to perform the exact same steps for IPv6 except you will add in an IPv6 address for the DNS server (see Figure 14).

Figure 12. Turning off Automatic metric.

Figure 13. Add in an IP address of a server, I added in one from Google.
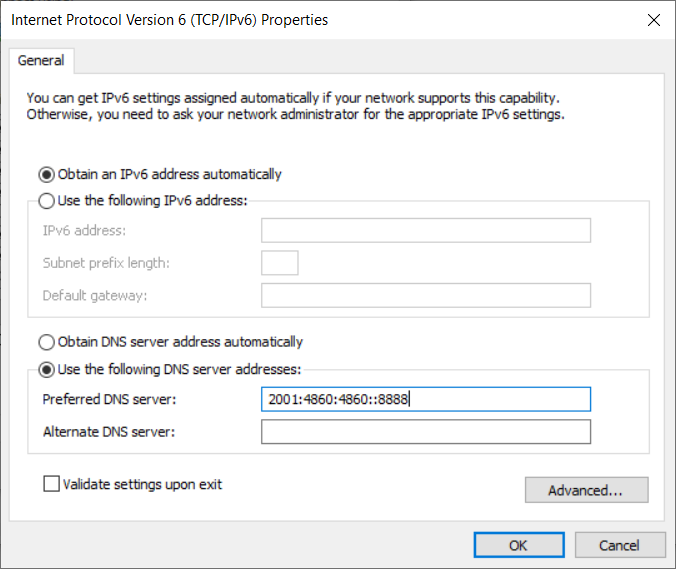
Figure 14. Do the same steps for IPv6 except here you’ll have to add in an IPv6 DNS server address, the example here is again from Google.
One final protocol left! However this section is the worse part, for more than one reason. This section covers WPAD, a protocol with a long history of being insecure and being easily abused. For some reason, in recent months Microsoft has decided to make it quite difficult to disable. First off, go into “Network & Internet” in Settings, and click on Proxy. Make sure the two options in “Automatic proxy setup” are both turned off (see Figure 15). They may already be off on most Home Edition installs, just make sure they actually are.

Figure 15. Make sure the Automatic proxy setup is off.
Normally we would go into Services and disable the WinHttpAutoProxySvc service and we’d be done. Recently Microsoft decided to prevent Windows 10 Home Edition users from being able to do that, and they’ve enforced it with strict permissions so that even someone with Administrator access cannot disable the service. Therefore we will have to go into the Registry and remove these permissions. Launch “regedit” from the search bar, and navigate to HKLM\SYSTEM\CurrentControlSet\Services\WinHttpAutoProxySvc. Once there, we need to delete RequiredPrivileges (see Figure 16). You will get a dialog box to confirm this, answer Yes.

Figure 16. Deleting Registry settings is always fun, as you get to see a scary warning box.
You can now go into Services and disable WinHttpAutoProxySvc, but since you are right here, edit the Start DWORD value from 3 to 4. Exit and reboot. You’re done!
Like I stated before, it is disappointing that after all of the positive security efforts Microsoft has made that they would enable so many privacy-invading settings, and leave so many flawed protocols active. But after completing these steps you will be better protected. Let’s hope any future changes to these policies and settings down the road are positive ones, and not more of the same.
P.S. - Don’t forget to watch the companion video!